 Vue3 API 源码解析
# # Vue3 API 源码解析
# # Vue3源码目录结构
vue- @vue/runtime-dom
@vue/runtime-dom:运行时,支持把render函数反应到dom上createApp、模板上一切api或组件:v-model、v-show、Transition组件(源码解析)- @vue/runtime-core
@vue/runtime-core(核心)- @vue/server-renderer: ssr
- @vue/share: 记录一些共享的配置
- @vue/template-explorer: 实时查看vue3 template模板编译为render函数的网站 (opens new window) (opens new window)。核心代码: Vue.compile(source)
@vue/compiler-dom: 编译时,支持把template模板代码,编译为render函数- @vue/compiler-core
- @vue/compiler-core: compiler核心实现,涉及到template -> baseParse(parse.ts) -> ast -> generate(codegen.ts)
# # 1. createApp
# # api 使用
    import { createApp } from 'vue'
    import App from './App.vue'

    createApp(App).mount('#app')
2
3
4
5
# # 源码解析
- 确定template -> 2. 执行mount,即vnode(patch) -> diff -> dom流程
    // https://github.com/vuejs/vue-next/blob/master/packages/runtime-dom/src/index.ts#L53
    export const createApp = ((...args) => {
      const app = ensureRenderer().createApp(...args)

      const { mount } = app
      app.mount = (containerOrSelector: Element | string): any => {
        const container = normalizeContainer(containerOrSelector)
        if (!container) return

        // 确定template
        const component = app._component
        if (!isFunction(component) && !component.render && !component.template) {
          component.template = container.innerHTML
        }
        // clear content before mounting
        container.innerHTML = ''

        // 执行mount,即vnode(patch) -> diff -> dom流程
        const proxy = mount(container)
        container.removeAttribute('v-cloak')
        container.setAttribute('data-v-app', '')
        return proxy
      }

      return app
    }) as CreateAppFunction<Element>
2
3
4
5
6
7
8
9
10
11
12
13
14
15
16
17
18
19
20
21
22
23
24
25
26
27
# # 2. watchEffect、watch
# # api 使用
watchEffect只是简单的副作用函数,只需要在逻辑函数中使用到getter对象(ref.value,state.xxx)即可,getter对象自动依赖收集callback。
watch api 跟vue2.x中的watch api类似,需要监听某个响应式对象的变化,并给出currentValue/preValue。但在vue3中响应式对象又分为ref和reactive对象。难以区分第一个参数到底怎么传?告诉一个法则即可:(源码里都会处理为返回getter函数,源码解析在后面)
- ref/reactive完整对象直接使用
- reactive.xxx对象使用函数包装
    let refNum = ref(0)
    let state = reactive({ name: 'leo', age: 19 })
    console.log(isRef(state.name)) // false
    console.log(isRef(refNum)) // true
    const onBtnClick=() => {
        refNum.value += 1
        state.name += '1'
    }

    // 简易watch:副作用函数
    watchEffect(() => {
        console.log(state.name) // leo
    })

    // 侦听器的数据源可以是一个拥有返回值的 getter 函数,也可以是 ref
    watch(() => refNum.value, (val, preVal) => {
        console.log('changed refNum', val, preVal)
    })
    watch(refNum, (val, preVal) => { // 第一个参数为ref对象时,会自动转为上面getter函数
        console.log('changed refNum by ref', val, preVal)
    })
    watch(() => state.name, (val, preVal) => { // 对于reactive.xxx对象,这里一定要是getter函数
        console.log('changed name', val, preVal)
    })
    watch(state, (val, preVal) => {
        console.log(val===preVal) // true // 对于reactive对象(引用对象),此时val和preValue是相同的
    })
    // 也可以是一个数组
    watch([refNum, () => state.name], ([numValue, nameValue], [numPreValue, preNameValue]) => { // 数组
        console.log(numValue, numPreValue, nameValue, preNameValue)
    })
2
3
4
5
6
7
8
9
10
11
12
13
14
15
16
17
18
19
20
21
22
23
24
25
26
27
28
29
30
31
32
# # 源码解析
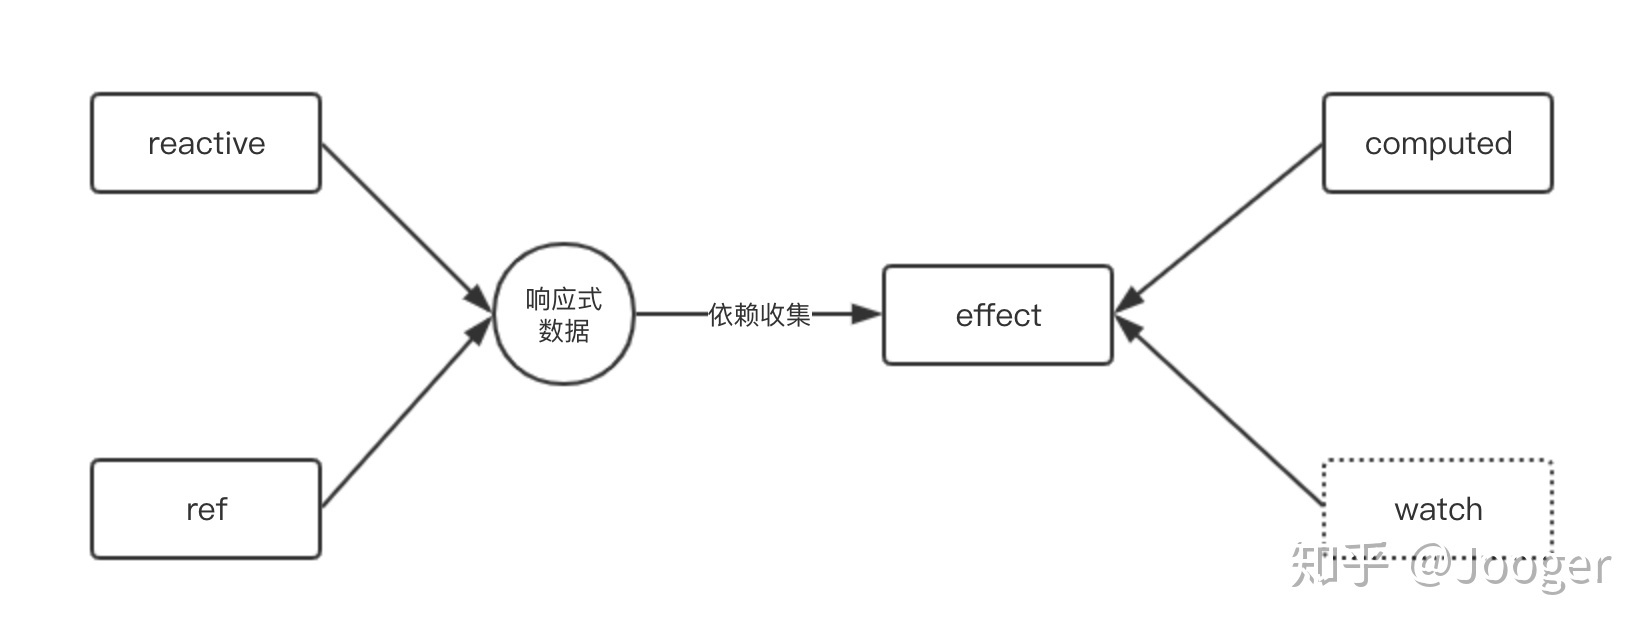
watchEffect和watch api底层都调用doWatch函数。可以看下定义的TypeScript类型 WatchSource,从这就能看出我们的api方式是支持3种的。
api第一个参数看上去有3种形态,底层都会返回getter函数,其核心还是为了拿到响应式数据的值。
    // https://github.com/vuejs/vue-next/blob/master/packages/runtime-core/src/apiWatch.ts#:L75
    export function watchEffect(effect: WatchEffect, options?: WatchOptionsBase): WatchStopHandle {
      return doWatch(effect, null, options) // effect为副作用函数。doWatch是核心
    }

    // WatchSource类型,只支持ref对象/computedRef对象/函数对象(reactive方式)
    export type WatchSource<T = any> = Ref<T> | ComputedRef<T> | (() => T)
    export function watch<T = any>(source: WatchSource<T> | WatchSource<T>[], cb: WatchCallback<T>, options?:WatchOptions): WatchStopHandle {
      return doWatch(source, cb, options)
    }
2
3
4
5
6
7
8
9
10
11
看下doWatch实现。本质上watch意义就是,当依赖的响应式对象值改变时,执行callback函数。(effect作用就是把响应式数据 与 callback函数绑定在一起)
对应的核心代码是这段:
    // effect作用 = getter(响应式数据) + callback连接
    const runner = effect(getter, {
        lazy: true,
        onTrack,
        onTrigger,
        scheduler // 存放callback,当getter内的响应式数据值变化时,执行scheduler(也即执行callback)
      })
    oldValue = runner()
2
3
4
5
6
7
8
9
watch api核心流程:
- getter函数中,return返回响应式对象。(第一个参数的意义)
- 当响应式对象值变化时执行scheduler函数
- scheduler中确定了job执行时机
- job中执行cb回调函数
    // 核心:当source内的响应式对象变化时,cb执行。依赖收集的核心在effect函数中
    function doWatch(source: WatchSource | WatchSource[] | WatchEffect,
      cb: WatchCallback | null,
      { immediate, deep, flush, onTrack, onTrigger }: WatchOptions = EMPTY_OBJ,
      instance = currentInstance
    ): WatchStopHandle {

      // 1. 第一个参数处理,拿到getter函数:() => 响应式数据
      let getter: () => any
      if (isRef(source)) {
        getter = () => source.value // 1.1 watch api: ref处理
      } else if (isReactive(source)) {
        getter = () => source // 1.2 watch api:reactive处理
        deep = true
      } else if (isArray(source)) { // 1.3 watch api:数组处理
        getter = () =>
          source.map(s => {
            if (isRef(s)) {
              return s.value
            } else if (isReactive(s)) {
              return traverse(s)
            } else if (isFunction(s)) {
              return callWithErrorHandling(s, instance, ErrorCodes.WATCH_GETTER)
            } else {
              __DEV__ && warnInvalidSource(s)
            }
          })
      } else if (isFunction(source)) { // 函数处理
        if (cb) {
          // 1.4 watch api:() => reactive.xxx处理
          getter = () =>
            callWithErrorHandling(source, instance, ErrorCodes.WATCH_GETTER)
        } else {
          // watchEffect api: getter直接执行。 此时source == effect函数
          getter = () => {
            if (instance && instance.isUnmounted) {
              return
            }
            if (cleanup) {
              cleanup()
            }
            return callWithErrorHandling(
              source, // 直接执行effect函数:effect函数中有响应式对象,执行时会对响应式对象依赖收集
              instance,
              ErrorCodes.WATCH_CALLBACK,
              [onInvalidate]
            )
          }
        }
      } else {
        getter = NOOP
      }

      // 2. 当依赖的getter变化时,job就会执行(job 基本等同 callback)
      const job = () => {
        if (cb) {
          // 2.1 watch(source, cb) api
          const newValue = runner()
          // hasChanged: 只有value变化时,cb才执行
          if (deep || hasChanged(newValue, oldValue)) {
            // 执行cb回调
            callWithAsyncErrorHandling(cb, instance, ErrorCodes.WATCH_CALLBACK, [
              newValue,
              oldValue === INITIAL_WATCHER_VALUE ? undefined : oldValue,
              onInvalidate
            ])
            oldValue = newValue
          }
        } else {
          // 2.2 watchEffect api
          runner()
        }
      }
      scheduler = job // 源码有调度机制,这里简化了

      const runner = effect(getter, {
        lazy: true,
        onTrack,
        onTrigger,
        scheduler // 简单理解:scheduler == job == cb
      })
      oldValue = runner() // runner执行 = getter()拿到响应式数据oldValue + 把getter中的响应式数据与cb关联
    }
2
3
4
5
6
7
8
9
10
11
12
13
14
15
16
17
18
19
20
21
22
23
24
25
26
27
28
29
30
31
32
33
34
35
36
37
38
39
40
41
42
43
44
45
46
47
48
49
50
51
52
53
54
55
56
57
58
59
60
61
62
63
64
65
66
67
68
69
70
71
72
73
74
75
76
77
78
79
80
81
82
83
84
# # 3. computed
# # api 使用
    // ref
    const count = ref(1)
    const plusOne = computed(() => count.value + 1) //  2
    count.value += 1

    // 支持get/set方式
    const plusOne = computed({
      get: () => count.value + 1,
      set: (val) => {
        count.value = val - 1
      },
    })


    // reactive computed
    const state = reactive({ count: 1})
    const plus = computed(() => state.count + 1) // 2
    state.count += 1
2
3
4
5
6
7
8
9
10
11
12
13
14
15
16
17
18
19
# # 源码解析
computed和watch原理基本一致,都是依赖effect函数完成响应式数据和callback连接。
所以computed api接受一个getter函数,并且可以返回新的响应式数据。关于computed api设计思想,推荐官方computed教程 (opens new window) (opens new window)。
理解以上effect的作用,代码就简单多了:
    export function computed<T>(
      getterOrOptions: ComputedGetter<T> | WritableComputedOptions<T>
    ) {
      // 1. 第一个参数,支持function和object(get/set)两种api。最终还是要拿到getter函数
      let getter: ComputedGetter<T>
      let setter: ComputedSetter<T>

      if (isFunction(getterOrOptions)) {
        getter = getterOrOptions
        setter =  NOOP
      } else {
        getter = getterOrOptions.get
        setter = getterOrOptions.set
      }

      let dirty = true
      let value: T
      let computed: ComputedRef<T>

      // 2. effect:连接 响应式数据 + callback
      const runner = effect(getter, {
        lazy: true,
        scheduler: () => {
          if (!dirty) {
            dirty = true
            trigger(computed, TriggerOpTypes.SET, 'value')
          }
        }
      })

      // 3. 返回computed响应式对象
      computed = {
        __v_isRef: true,
        // expose effect so computed can be stopped
        effect: runner,
        get value() {
          // 3.1 当用到computed值时,实时计算runner()值
          if (dirty) {
            value = runner()
            dirty = false
          }
          // 3.2 对computed依赖收集
          track(computed, TrackOpTypes.GET, 'value')
          return value
        },
        set value(newValue: T) {
          setter(newValue)
        }
      } as any
      return computed
    }
2
3
4
5
6
7
8
9
10
11
12
13
14
15
16
17
18
19
20
21
22
23
24
25
26
27
28
29
30
31
32
33
34
35
36
37
38
39
40
41
42
43
44
45
46
47
48
49
50
51
52
computed和watch api,第一个参数都是传入getter函数,本质上是因为底层effect需要对getter里的响应式对象依赖收集。
# # 4. provide/inject
# # api 使用
    const StoreSymbol = Symbol()

    provide(StoreSymbol, value) // provide:对外提供value值

    const store = inject(StoreSymbol) // inject:获得key对应的value值
2
3
4
5
6
# # 源码解析
provide api 等同于在全局hash存储key/value,inject api就是根据从key中拿到value值
    export function provide<T>(key: InjectionKey<T> | string, value: T) {
        let provides = currentInstance.provides

        const parentProvides =
          currentInstance.parent && currentInstance.parent.provides
        if (parentProvides === provides) {
          provides = currentInstance.provides = Object.create(parentProvides)
        }
        // TS doesn't allow symbol as index type
        provides[key as string] = value
    }

    export function inject(
      key: InjectionKey<any> | string,
      defaultValue?: unknown
    ) {
      // fallback to `currentRenderingInstance` so that this can be called in
      // a functional component
      const instance = currentInstance || currentRenderingInstance
      if (instance) {
        const provides = instance.provides
        if (key in provides) {
          // TS doesn't allow symbol as index type
          return provides[key as string]
        } else if (arguments.length > 1) {
          return defaultValue
        }
      }
    }
2
3
4
5
6
7
8
9
10
11
12
13
14
15
16
17
18
19
20
21
22
23
24
25
26
27
28
29
30
# # nextTick
# # createRenderer
自定义render渲染器
    // @vue/runtime-core
    // 使用: const {render, createApp} = createRenderer(options)

    export function createRenderer<
      HostNode extends object = any,
      HostElement extends HostNode = any
    >(
      options: RendererOptions<HostNode, HostElement>
    ): {
      render: RootRenderFunction<HostNode, HostElement>
      createApp: () => App<HostElement>
    } {
      // 新老vnode对比patch(diff)
      const render: RootRenderFunction<
        HostNode,
        HostElement & {
          _vnode: HostVNode | null
        }
      > = (vnode, container) => {
        if (vnode == null) {
          if (container._vnode) {
            unmount(container._vnode, null, null, true)
          }
        } else {
          patch(container._vnode || null, vnode, container)
        }
        flushPostFlushCbs()
        container._vnode = vnode
      }

      return {
        render,
        createApp: createAppAPI(render) // 最终对外使用的函数对象
      }
    }
2
3
4
5
6
7
8
9
10
11
12
13
14
15
16
17
18
19
20
21
22
23
24
25
26
27
28
29
30
31
32
33
34
35
36