 scrapy的深入使用
# scrapy的深入使用
# 学习目标:
- 了解 scrapy debug信息
- 了解 scrapy shell的使用
- 掌握 scrapy的settings.py设置
- 掌握 scrapy管道(pipelines.py)的使用
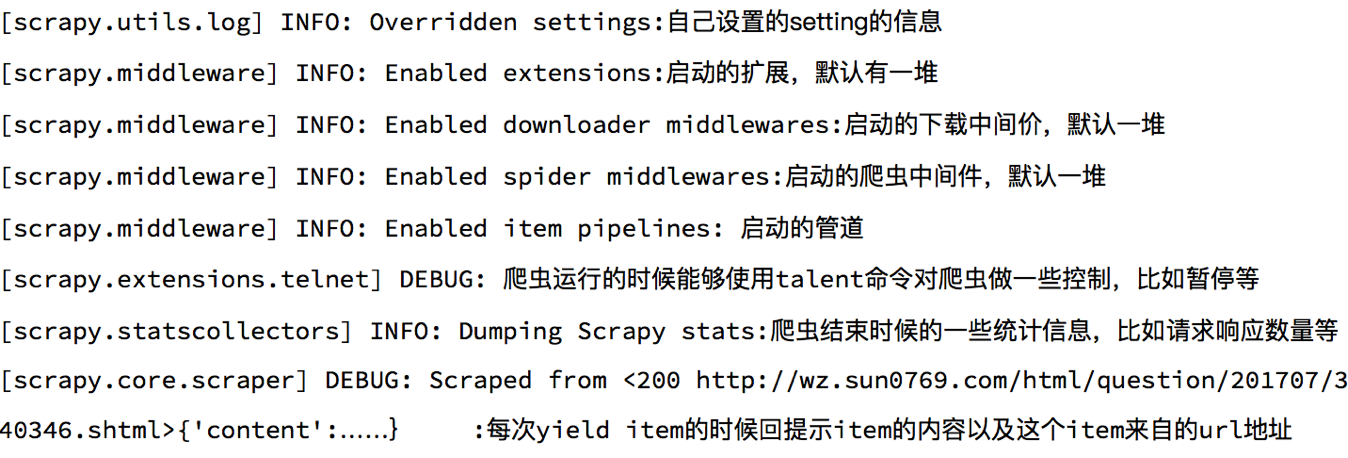
# 1 了解scrapy的debug信息

# 2 了解scrapyShell
scrapy shell是scrapy提供的一个终端工具,能够通过它查看scrapy中对象的属性和方法,以及测试xpath
使用方法:
scrapy shell http://www.itcast.cn/channel/teacher.shtml
1
在终端输入上述命令后,能够进入python的交互式终端,此时可以使用:
- response.xpath():直接测试xpath规则是否正确
- response.url:当前响应的url地址
- response.request.url:当前响应对应的请求的url地址
- response.headers:响应头
- response.body:响应体,也就是html代码,默认是byte类型
- response.requests.headers:当前响应的请求头
# 3 settings.py中的设置信息
# 3.1 为什么项目中需要配置文件
在配置文件中存放一些公共变量,在后续的项目中方便修改,如:本地测试数据库和部署服务器的数据库不一致
# 3.2 配置文件中的变量使用方法
- 变量名一般全部大写
- 导入即可使用
# 3.3 settings.py中的重点字段和含义
- USER_AGENT 设置ua
- ROBOTSTXT_OBEY 是否遵守robots协议,默认是遵守
- CONCURRENT_REQUESTS 设置并发请求的数量,默认是16个
- DOWNLOAD_DELAY 下载延迟,默认无延迟
- COOKIES_ENABLED 是否开启cookie,即每次请求带上前一次的cookie,默认是开启的
- DEFAULT_REQUEST_HEADERS 设置默认请求头,这里加入了USER_AGENT将不起作用
- SPIDER_MIDDLEWARES 爬虫中间件,设置过程和管道相同
- DOWNLOADER_MIDDLEWARES 下载中间件
- LOG_LEVEL 控制终端输出信息的log级别,终端默认显示的是debug级别的log信息
- LOG_LEVEL = "WARNING"
- LOG_FILE 设置log日志文件的保存路径,如果设置该参数,终端将不再显示信息
- LOG_FILE = "./test.log"
- 其他设置参考:https://www.jianshu.com/p/df9c0d1e9087 (opens new window)
# 4 pipeline管道的深入使用
之前我们在scrapy入门使用一节中学习了管道的基本使用,接下来我们深入的学习scrapy管道的使用
# 4.1 pipeline中常用的方法:
- process_item(self,item,spider):实现对item数据的处理
- open_spider(self, spider): 在爬虫开启的时候仅执行一次
- close_spider(self, spider): 在爬虫关闭的时候仅执行一次
# 4.2 管道文件的修改
在pipelines.py代码中完善
import json
from pymongo import MongoClient

class ItcastFilePipeline(object):
    def open_spider(self, spider):  # 在爬虫开启的时候仅执行一次
        if spider.name == 'itcast':
            self.f = open('json.txt', 'a', encoding='utf-8')

    def close_spider(self, spider):  # 在爬虫关闭的时候仅执行一次
        if spider.name == 'itcast':
            self.f.close()

    def process_item(self, item, spider):
        if spider.name == 'itcast':
            self.f.write(json.dumps(dict(item), ensure_ascii=False, indent=2) + ',\n')
        return item  # 不return的情况下,另一个权重较低的pipeline将不会获得item

class ItcastMongoPipeline(object):
    def open_spider(self, spider):  # 在爬虫开启的时候仅执行一次
        if spider.name == 'itcast':
            con = MongoClient(host='127.0.0.1', port=27017) # 实例化mongoclient
            self.collection = con.itcast.teachers # 创建数据库名为itcast,集合名为teachers的集合操作对象

    def process_item(self, item, spider):
        if spider.name == 'itcast':
            self.collection.insert(dict(item)) # 此时item对象需要先转换为字典,再插入
        # 不return的情况下,另一个权重较低的pipeline将不会获得item
        return item
1
2
3
4
5
6
7
8
9
10
11
12
13
14
15
16
17
18
19
20
21
22
23
24
25
26
27
28
2
3
4
5
6
7
8
9
10
11
12
13
14
15
16
17
18
19
20
21
22
23
24
25
26
27
28
# 4.3 开启管道
在settings.py设置开启pipeline
......
ITEM_PIPELINES = {
    'myspider.pipelines.ItcastFilePipeline': 400, # 400表示权重
    'myspider.pipelines.ItcastMongoPipeline': 500,
}
......
1
2
3
4
5
6
2
3
4
5
6
别忘了开启mongodb数据库 sudo service mongod start 并在mongodb数据库中查看 mongo
思考:pipeline在settings中能够开启多个,为什么需要开启多个?
- 不同的pipeline可以处理不同爬虫的数据,通过spider.name属性来区分
- 不同的pipeline能够对一个或多个爬虫进行不同的数据处理的操作,比如一个进行数据清洗,一个进行数据的保存
- 同一个管道类也可以处理不同爬虫的数据,通过spider.name属性来区分
# 4.4 pipeline使用注意点
- 使用之前需要在settings中开启
- pipeline在setting中键表示位置(即pipeline在项目中的位置可以自定义),值表示距离引擎的远近,越近数据会越先经过
- 有多个pipeline的时候,process_item的方法必须return item,否则后一个pipeline取到的数据为None值
- pipeline中process_item的方法必须有,否则item没有办法接受和处理
- process_item方法接受item和spider,其中spider表示当前传递item过来的spider
- open_spider(spider) :能够在爬虫开启的时候执行一次
- close_spider(spider) :能够在爬虫关闭的时候执行一次
- 上述俩个方法经常用于爬虫和数据库的交互,在爬虫开启的时候建立和数据库的连接,在爬虫关闭的时候断开和数据库的连接
# 总结
- debug能够展示当前程序的运行状态
- scrapy shell能够实现xpath的测试和对象属性和方法的尝试
- scrapy的settings.py能够实现各种自定义的配置,比如下载延迟和请求头等
- 管道能够实现数据的清洗和保存,能够定义多个管道实现不同的功能,其中有个三个方法
- process_item(self,item,spider):实现对item数据的处理
- open_spider(self, spider): 在爬虫开启的时候仅执行一次
- close_spider(self, spider): 在爬虫关闭的时候仅执行一次
编辑 (opens new window)
