React源码分析 - 四大组件
# # React源码分析 - 四大组件
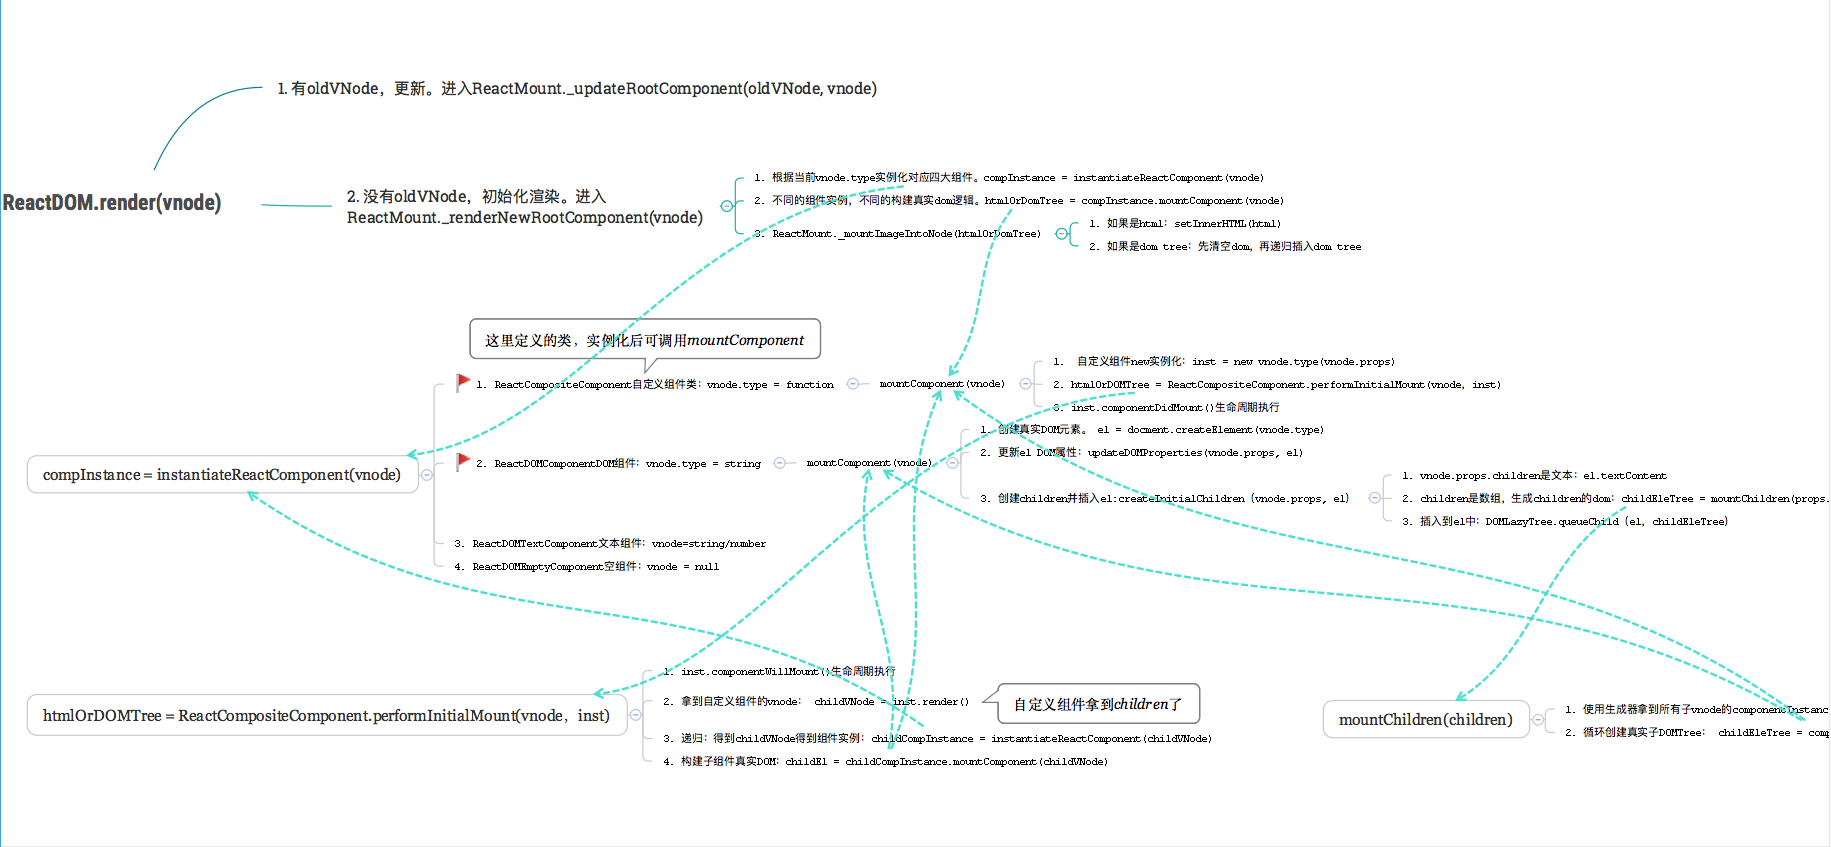
上节React源码分析 - 挂载和渲染 (opens new window) (opens new window)了解了React挂载和渲染整体流程,但没详细分析,VNode到生成真实DOM做了哪些内容。这就要看上节instantiateReactComponent函数中提到的React四大组件。
# # VNode对象 --> Component对象 --> HTML字符串
根据type生成对应的包装组件实例Instance。当需要插入到真实DOM时,执行Instance.mountComponent()即可得到组件的HTML。即:var innerHTML = new new ReactDOMXXXComponent(VNode).mountComponent(VNode)
- 空组件。
ReactDOMEmptyComponent - 原生DOM组件,最终生成真实DOM都需要它。
ReactDOMComponent - 自定义组件,最常用,有生命周期。
ReactCompositeComponent - 文字组件。
ReactDOMTextComponent
# # VNode --> Component对象
instantiateReactComponent主要作用是拆分职责,VNode不同的type类型(对应createElement(type)),用不同的Component对象去实现。
    // instantiateReactComponent.js
    // 根据VNode.type拿到对应的组件实例
    function instantiateReactComponent(node, shouldHaveDebugID) {
      var instance;

      if (node === null || node === false) {
        // 1.ReactEmptyComponent组件。
        instance = ReactEmptyComponent.create(instantiateReactComponent);
      } else if (typeof node === 'object') {
        var element = node;
        var type = element.type;
        if (typeof type !== 'function' && typeof type !== 'string') {
            if (typeof element.type === 'string') {
                // 2. 创建h1/input等DOM元素的Component
                instance = ReactHostComponent.createInternalComponent(element);
            } else {
                // 3. ReactCompositeComponent组件(自定义组件)
                instance = new ReactCompositeComponentWrapper(element);
            }
      } else if (typeof node === 'string' || typeof node === 'number') {
        // 4. ReactTextComponent组件
        instance = ReactHostComponent.createInstanceForText(node);
      }

      return instance;
    }
2
3
4
5
6
7
8
9
10
11
12
13
14
15
16
17
18
19
20
21
22
23
24
25
26
27
# # Component对象 --> HTML字符串
# # 1. 空组件/文字组件生成HTML
很简单的逻辑,不需要复杂更新DOM以及递归
    // 1. 空组件。ReactDOMEmptyComponent.js
    ReactDOMEmptyComponent.mountComponent = function () {
      return '<!--' + nodeValue + '-->';
    }

    // 4. 纯文字组件。ReactDOMTextComponent.js
    ReactDOMTextComponent.mountComponent = function () {
      return escapedText;
    }
2
3
4
5
6
7
8
9
10
# # 2. DOM组件
需要处理DOM API(自定义组件中不操作DOM API),如事件监听、创建真实的DOM元素、根据props、props.children更改DOM元素等
    // 2. ReactDOMComponent.js
    ReactDOMComponent.mountComponent = function () {
      var props = this._currentElement.props;

      // 直接根据type创建dom元素
      el = document.createElement(this._currentElement.type);
      // 根据props上的值,更新el属性
      this._updateDOMProperties(null, props, transaction);
      // 处理props.children,设置到el.childNodes中
      var lazyTree = DOMLazyTree(el); // 新建lazyTree构造函数
      // 1. 如果是innerHtml,直接设置el.innerHTML
      // 2. 如果是props.children是纯文本/数字,直接设置el.textContent
      // 3. 以上都不是,那就是数组了,可能是[DOM组件,DOM组件]也可能是[自定义组件,自定义组件],或者他们的混合。此时需要递归,执行instantiateReactComponent(这里的代码比较复杂,就不粘贴出来了)
      this._createInitialChildren(transaction, props, context, lazyTree);
      return lazyTree
    }
2
3
4
5
6
7
8
9
10
11
12
13
14
15
16
17
# # 3. 自定义组件
最常用,需要处理生命周期、书写render函数、递归子组件等。
看ReactCompositeComponent.mountComponent源码:
new StatelessComponent(function),无状态组件react框架帮你内置renderperformInitialMount()。关键函数,返回html。里面也有对自定义组件的state、props处理、生命周期、以及递归render()函数里的子组件。- 生命周期:
componentWillMount()(react v16被弃) renderVNode = render(),拿到子组件的VNode(这就是自定义组件一定要有render函数)。- 拿到renderVNode,此时算进入到子VNode,开始根据renderVNode进行递归(VNodeTree --> renderNodeTree/domNodeTree(子1) --> 子2 --> 直到深度遍历完成)。如何实现的呢:
child = instantiateReactComponent(renderVNode)child.mountComponent(renderVNode)
- 生命周期:
- 生命周期:
componentDidMount()
    // ReactCompositeComponent.js
    ReactCompositeComponent.mountComponent: function(
        transaction,
        hostParent,
        hostContainerInfo,
        context,
      ) {
        // this._currentElement = VNodeTree
        // 由于是在自定义组件内,Component是个function
        var Component = this._currentElement.type;
        var renderedElement;

        // 如果是自定义函数式组件,帮你内置render函数。
        if ((inst == null || inst.render == null)) {
          renderedElement = new StatelessComponent(Component);
        }

        // 自定义组件的state、props处理、生命周期、以及递归render()函数里的子组件
        markup = this.performInitialMount(
          renderedElement,
          hostParent,
          hostContainerInfo,
          transaction,
          context,
        );

        // 执行componentDidMount生命周期
        if (inst.componentDidMount) {
            transaction.getReactMountReady().enqueue(inst.componentDidMount, inst);
        }

        return markup;
      }
2
3
4
5
6
7
8
9
10
11
12
13
14
15
16
17
18
19
20
21
22
23
24
25
26
27
28
29
30
31
32
33
34
    // 函数式组件,其实只是帮你内置了render
    function StatelessComponent(Component) {}
      StatelessComponent.prototype.render = function() {
      // 自定义组件的VNode.type是个函数
      var Component = ReactInstanceMap.get(this)._currentElement.type;
      // 最终都是调用VNode.type()
      var element = Component(this.props, this.context, this.updater);
      return element;
    };
2
3
4
5
6
7
8
9
10
    performInitialMount: function(
        renderedElement,
        hostParent,
        hostContainerInfo,
        transaction,
        context,
      ) {
        // 执行componentWillMount生命周期
        if (inst.componentWillMount) {
            inst.componentWillMount();
          }
        }

        // 执行render()函数,才能拿到子VNodeTree,也是数据递归的入口
        if (renderedElement === undefined) {
          renderedElement = this._renderValidatedComponent();
        }

        // 递归,子VNodeTree(此时的renderedElement)再执行instantiateReactComponent
        // 记住:递归最重要的是看它的数据在什么时候变化的.此时传入instantiateReactComponent方法的VNode已经变成子VNode。
        var child = this.instantiateReactComponent(
          renderedElement);
        return child.mountComponent()
      },
2
3
4
5
6
7
8
9
10
11
12
13
14
15
16
17
18
19
20
21
22
23
24
25
26
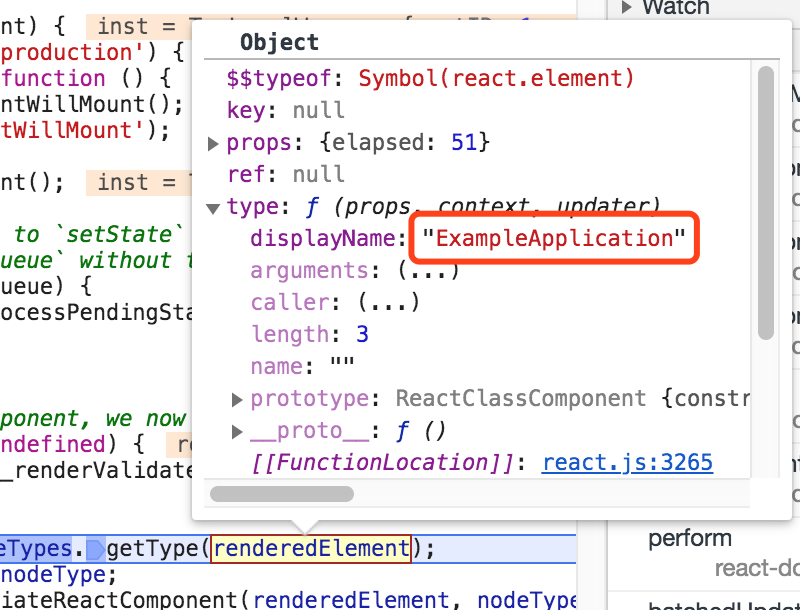
# # 详解VNodeTree递归
VNodeTree递归,帮助拿到最终需要插入的真实HTML。这中间用到四大组件(依赖四大组件的mountComponent生成真实HTML)。如何实现递归呢?空组件和文本组件不需要递归,自定义组件由于没有树形结构(没有children),只有调用render()才能拿到,所以自定义组件去调用render()函数,拿到子VNodeTree,再递归子VNodeTree。DOM组件有props.children,但children有可能包含纯文本、子Dom元素或者子自定义组件,所以这里也需要视情况递归。
注意:自定义组件里的逻辑是不操作DOM API(创建/设置dom元素)的,最终操作的地方是在DOM组件中。一般是自定义组件
    class ExampleApplication extends React.Component {
      render() {
        return (<p>123</p>)
      }
    }
    ReactDOM.render(<ExampleApplication/>, document.getElementById('app'))
2
3
4
5
6
7
    // 简化的VNodeTree
    {
       // 由于外层是自定义组件ExampleApplication,需要执行VNode.type()才能拿到子组件的VNode
       // 记住:自定义组件VNode是没有props.children的,普通元素才有props.children(这点和Vue类似)
      type: function(props, context, updater){
        // 执行ExampleApplicationVNode.type()后,得到普通元素VNode
        return {
          type: 'p',
          props: {
            children: '123'
          }
        }
      },
      props: null
    }
2
3
4
5
6
7
8
9
10
11
12
13
14
15
16
循环流程:
- 入口:
ReactMount._renderNewRootComponent(VNodeTree)-->instantiateReactComponent(VNodeTree)根据VNode的type得到实例,此时type是个function,走自定义组件ReactCompositeComponent实例 -->ReactCompositeComponent.mountComponent(VNodeTree)(因为this._currentElement===VNodeTree)(自定义组件mountComponent里有循环)
- 循环1: 自定义组件中(ReactCompositeComponent.mountComponent):
renderVNodeTree = ReactCompositeComponent.render()由于前提条件是已知自定义组件,调用render()得到renderVNodeTree。以上例子外层是p(renderVNodeTree.type === 'p') -->child = instantiateReactComponent(renderVNodeTree)。renderVNodeTree.type === 'p',拿到的child是ReactDOMComponent实例,进入ReactDOMComponent.mountComponent(renderVNodeTree)。 由于换成renderVNodeTree(renderVNodeTree的父类节点是VNode),就已经进入到子类了,实现循环了。
- 循环2: DOM组件中(
ReactDOMComponent.mountComponent(renderVNodeTree))- 已知在普通DOM组件中(意味着最外层标签是普通DOM元素),所以外层是直接根据tag构建DOM元素el。如果props.children是纯文本,直接更新el.nodeContext,子类是数组,递归调用instantiateReactComponent。
# # 完整流程
下图是React从VDOM到真实DOM渲染完整流程图,基本跟Vue完整流程图一样,根据VDOM数据结构,递归处理成真实DOM。两者不一样的地方:
递归实现细节不同,React是把VDOM区分成4种,对应着React4大组件。Vue则主要依赖patch(oldVNode, vnode)入口。自定义组件实现不同。React组件是完全透明的,实例化只是返回ChildVNode(通过render函数),不会修改中间值。Vue组件只是声明了对象options,最终还是要挂载在Vue类上,this就是指向这个实例化类。VDOM数据结构不同。React十分简单,type(function/string)、props。Vue则有componentOptions(中转vue组件)、data.on(收集了事件)、data.props、data.attrs等。